How to DIY Flat File Storage: A Step-by-Step Guide

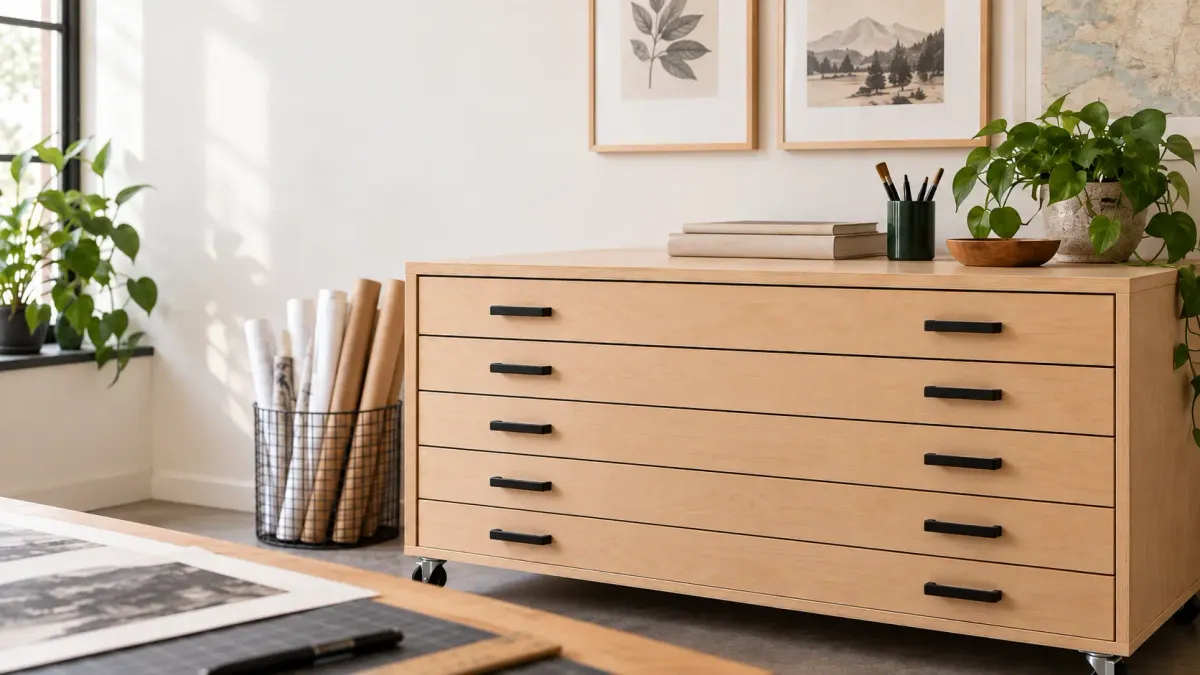
Large drawings, prints, maps, and posters are difficult to store in normal cabinets. Rolling them can work, but it is not ideal for every type of paper or artwork. A flat file keeps everything supported horizontally and makes each sheet easier to access.
But the problem is that flat files cost a lot, for example, Uline currently lists a five-drawer flat file for 36 × 24-inch sheets at $685, while its 48 × 36-inch model costs $1,050. That is why a DIY build can make sense if you already have basic woodworking tools. In this article, you will get a clear guide on how to build a DIY flat file storage, all by yourself, at a fraction of the cost.
What Can You Store in a DIY Flat File?
DIY flat file storage works best for wide, thin materials that need to stay flat. It keeps them supported across the whole surface instead of folding, rolling, or squeezing them into small cabinets. You can store:
- Drawings and sketches
- Watercolors
- Art prints
- Posters
- Maps
- Blueprints
- Architectural plans
- Photography
- Large paper sheets
- Vinyl sheets
- Cutting-machine materials
- Finished artwork
The Library of Congress recommends flat or rolled storage for oversized paper. It also recommends acid- and lignin-free protective enclosures for paper collections. The National Park Service also identifies flat-file drawers as suitable for maps, drawings, blueprints, and oversized artwork.
How to Decide the DIY Flat File Size?
Always start with your largest sheet, not the cabinet. Once you know that size, you can work out the drawer dimensions and then build the cabinet around them.
Start With the Largest Sheet You Need to Store
Measure the widest and longest piece you plan to keep inside the flat file. Your drawer needs to be larger than that sheet, so you can lift and remove it without catching the edges.
How Deep Should Flat File Drawers Be?
Flat-file drawers are normally shallow because you need surface area more than vertical space. Uline's commercial 42 × 30-inch flat file, for example, uses drawers with 2 inches of internal height. National Park Service preservation guidance recommends keeping enclosed stacks around 1 inch or less.
Choose Your DIY Flat File Design
You have several ways to build flat storage, and you do not need to follow one exact design. A full plywood cabinet gives you the most control, while an IKEA conversion reduces the amount of construction. Open shelves are even simpler if you do not need enclosed drawers.
Full Plywood Flat File Cabinet
A plywood cabinet makes the most sense when you want a permanent piece of furniture. For 24 × 36-inch sheets, 46¼ × 26¾-inch cabinet is a useful size reference. It gives you large drawers without creating an unnecessarily deep cabinet.
IKEA Kallax Flat File Conversion
A Kallax conversion saves you from building the outer frame. You mainly need to build shallow drawer boxes and fit them inside the existing openings. A practical conversion can use 3/4-inch plywood, 1/4-inch plywood, and 1 × 2 boards for the drawer structure.
For a five-drawer conversion, fronts around 2½ × 26¾ inches work inside the common Kallax layout. Drawer bottoms can sit around 26¼ × 14¼ inches. It is not large enough for full 24 × 36-inch sheets. However, it works well for smaller artwork, paper, vinyl, and studio materials.
Open-Shelf Flat Storage
If dust protection is not a major concern, you can skip drawers completely. Wide shelves spaced a few inches apart are much faster to build. A studio setup can use 39 × 24-inch shelves with roughly 4 to 6 inches between levels.
A basic system like this has been built for around $138 using older IKEA pricing. Current material costs will be higher, but the design remains one of the cheapest ways to get flat storage.
Materials and Tools You Will Need
Your material list will change depending on the size of your cabinet. A Kallax conversion needs much less plywood than a full cabinet for 24 × 36-inch artwork. Still, most builds use a similar group of materials and tools.
Materials
For a full plywood build, you will normally need:
- 3/4-inch plywood for the cabinet body
- 1/2-inch plywood for drawer sides where suitable
- 1/4-inch plywood for supported drawer bottoms
- Drawer slides
- Wood glue
- Wood screws or pocket screws
- Drawer pulls
- Label holders
- Edge banding
- Casters if needed
- Protective folders or liners
Do not leave the drawer slides until the end. Their thickness affects how wide your drawer boxes can be. If you build the drawers first, they may not fit once the slides are installed.
Tools
Useful tools include:
- Circular saw or table saw
- Drill and driver
- Tape measure
- Carpenter's square
- Clamps
- Electric sander
- 220-grit sandpaper
- Pocket-hole jig
- Pencil
- Straightedge
The documented Kallax project used a drill, clamps, an electric sander, and a Kreg pocket-hole system. The builder also used 220-grit sandpaper on the cut drawer parts before final assembly.
How to DIY Flat File Storage: Step-by-Step Guide
The easiest way to avoid measurement problems is to work from the inside outward. Start with the artwork, design the drawer, and build the cabinet around it.
Step 1: Measure Your Artwork and Plan the Cabinet
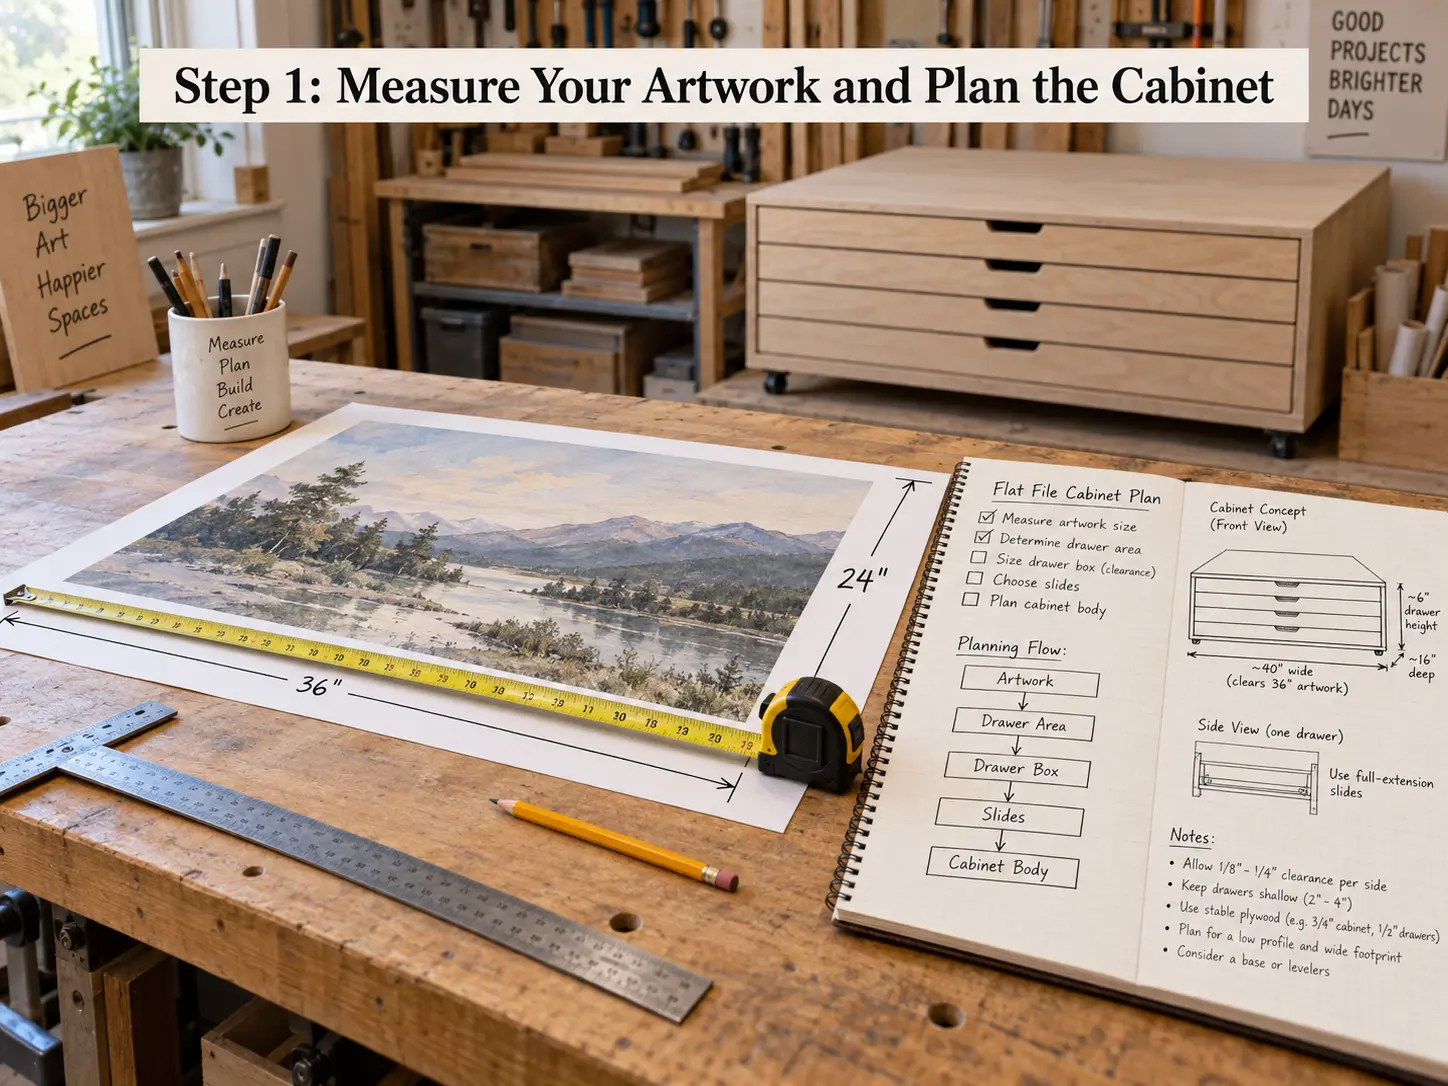
Let’s use 24 × 36-inch sheets as the working example. An internal drawer around 25 × 42 inches gives you enough space for comfortable handling. You can then build a cabinet around 46¼ × 26¾ × 24 inches. That keeps the cabinet large enough for the drawers without wasting unnecessary floor space.
Think of the design in this order:
Artwork → usable drawer area → drawer box → slides → cabinet body
Step 2: Cut the Cabinet Panels
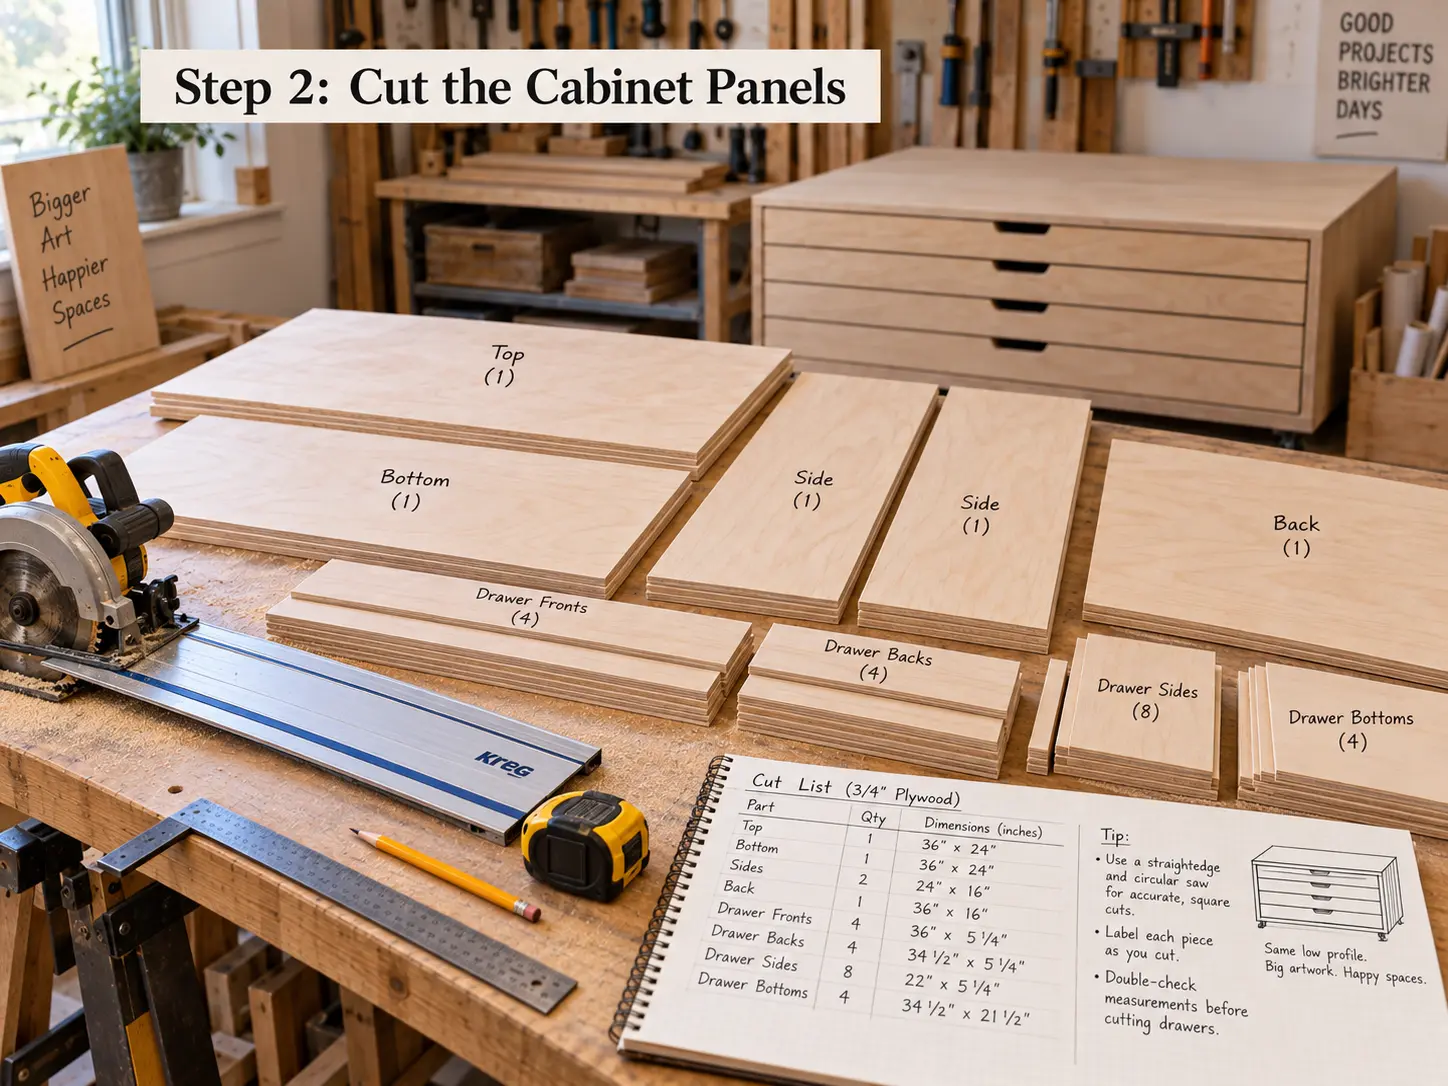
- Create a full cut list before touching the plywood. You will normally need a top, bottom, two sides, a back, drawer pieces, and drawer fronts.
- Cut matching pieces together whenever possible. If two cabinet sides should be identical, cutting them in one setup reduces small differences.
- Measure the actual plywood thickness as well. A sheet sold as 3/4-inch plywood does not always measure exactly 3/4 inch.
Step 3: Assemble and Square the Cabinet Frame
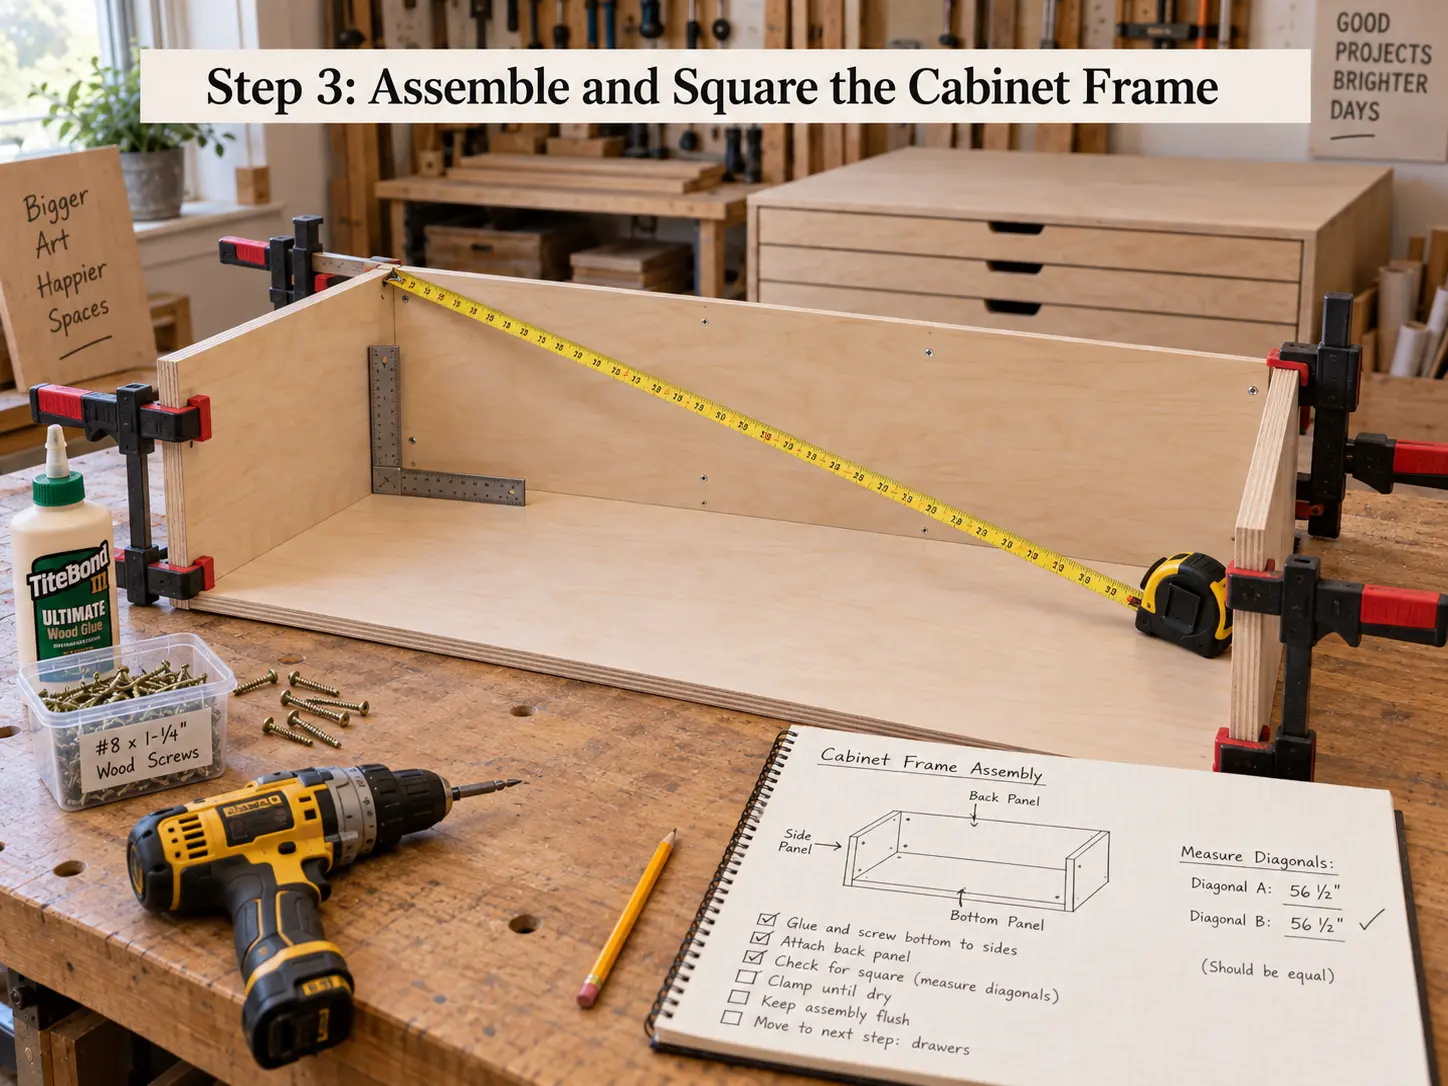
- Attach the bottom panel to both sides first. Once they are stable, add the back and top.
- Check every corner with a carpenter's square as you work. You can also measure diagonally across the cabinet in both directions.
- If both diagonal measurements match, the cabinet is square. If they do not, adjust the frame before the glue sets.
- Do not skip this step because flat-file drawers are wide.
Step 4: Build the Shallow Flat File Drawers
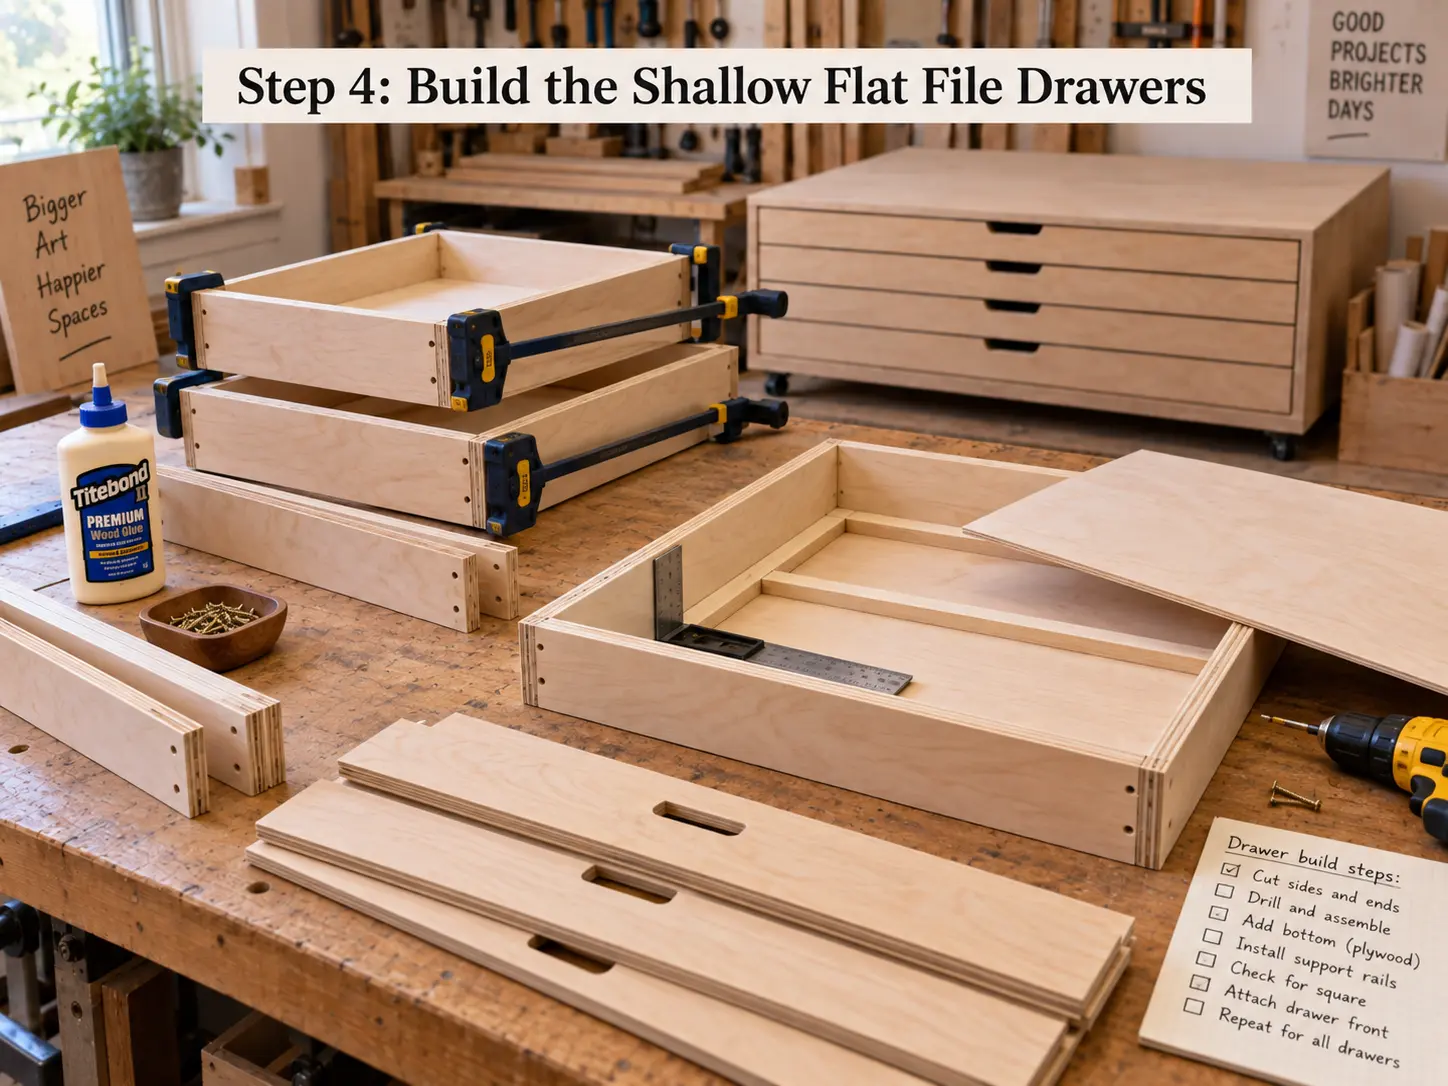
The drawers are the most important part of the build. A slightly rough cabinet exterior is mostly cosmetic, but poorly built drawers will annoy you every day.
Build the Drawer Frames
Start with two long sides and two shorter end pieces. Keep all repeated pieces exactly the same length. Dry-fit each drawer before adding glue. Then check the diagonal measurements to confirm that the box is square. Once everything lines up, glue and fasten the joints.
Install the Drawer Bottoms
Thin plywood works well for drawer bottoms, but large spans need support. A small 26¼ × 14¼-inch drawer can work with 1/4-inch plywood much more easily than a 40-inch-wide drawer. For larger drawers, support the bottom with grooves, rails, or internal framing. Do not simply screw a huge thin sheet underneath and expect it to stay flat forever.
Attach the Drawer Fronts
Install and test the drawer boxes before adding the visible fronts. Use equal spacers between each front so the gaps remain consistent. Long horizontal drawer fronts make uneven spacing very obvious. Stand a few feet away and check the entire cabinet before tightening everything. Small adjustments are much easier at this stage.
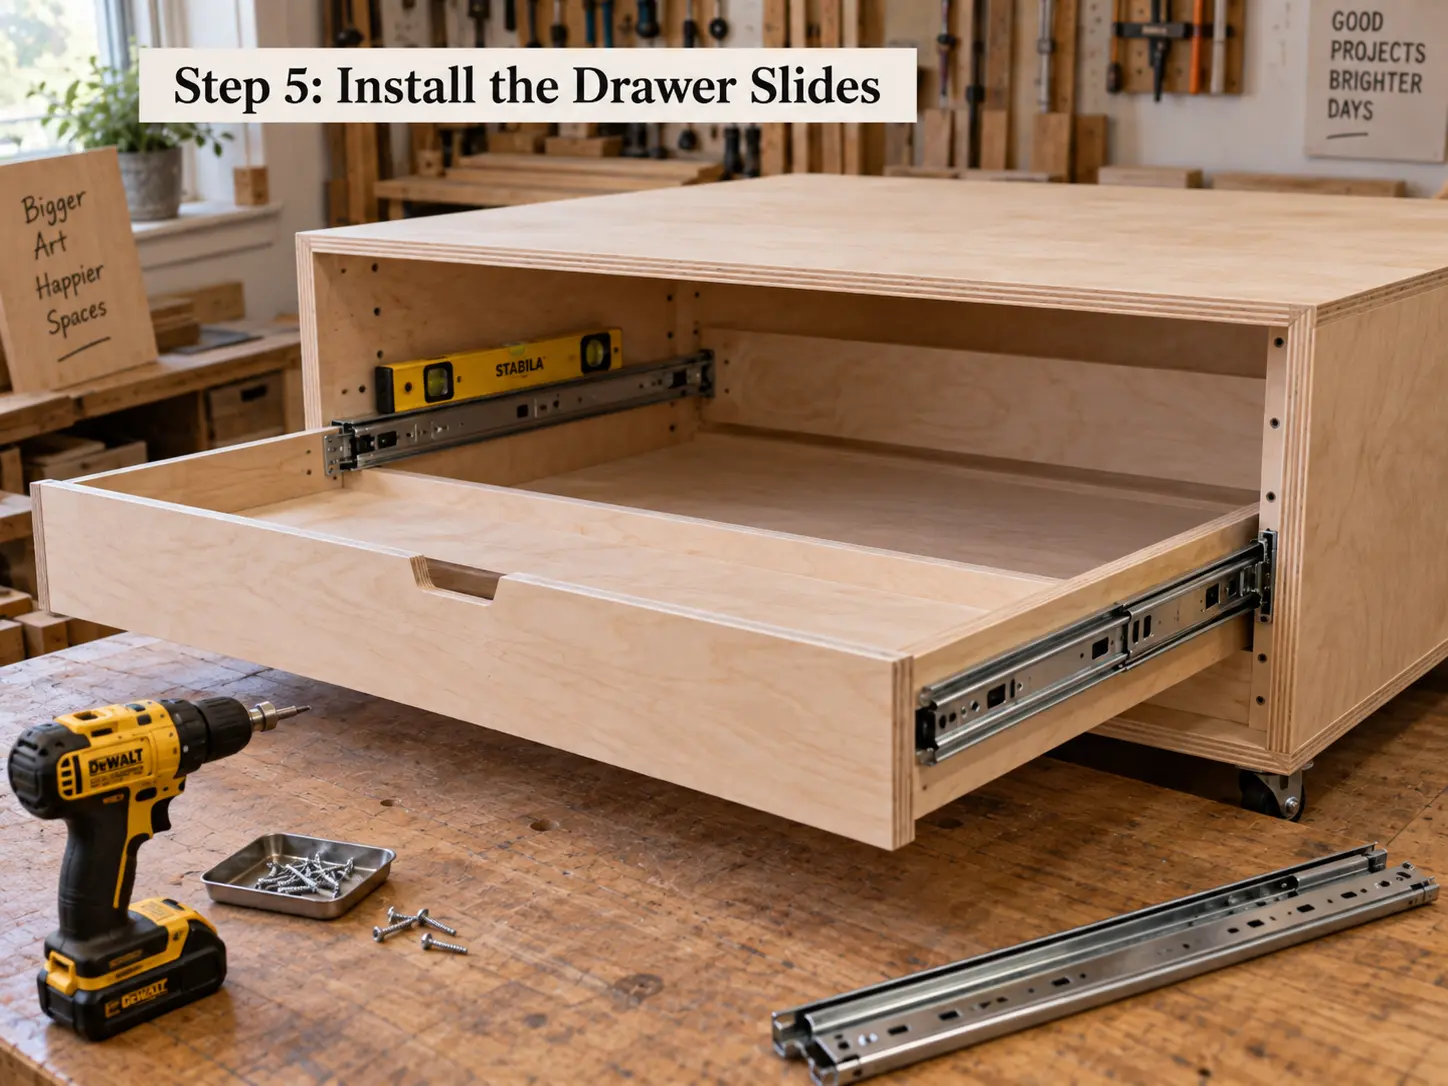
Step 5: Install the Drawer Slides
Side-mounted drawer slides need a precise gap between the drawer and cabinet wall. Check your chosen slides before cutting the final drawer width. Full-extension slides are usually the better choice for flat files. They let you pull the drawer farther out and reach sheets near the back.
Also check the weight rating before buying. Commercial flat files often support around 33 pounds per drawer, which gives you a useful reference point.
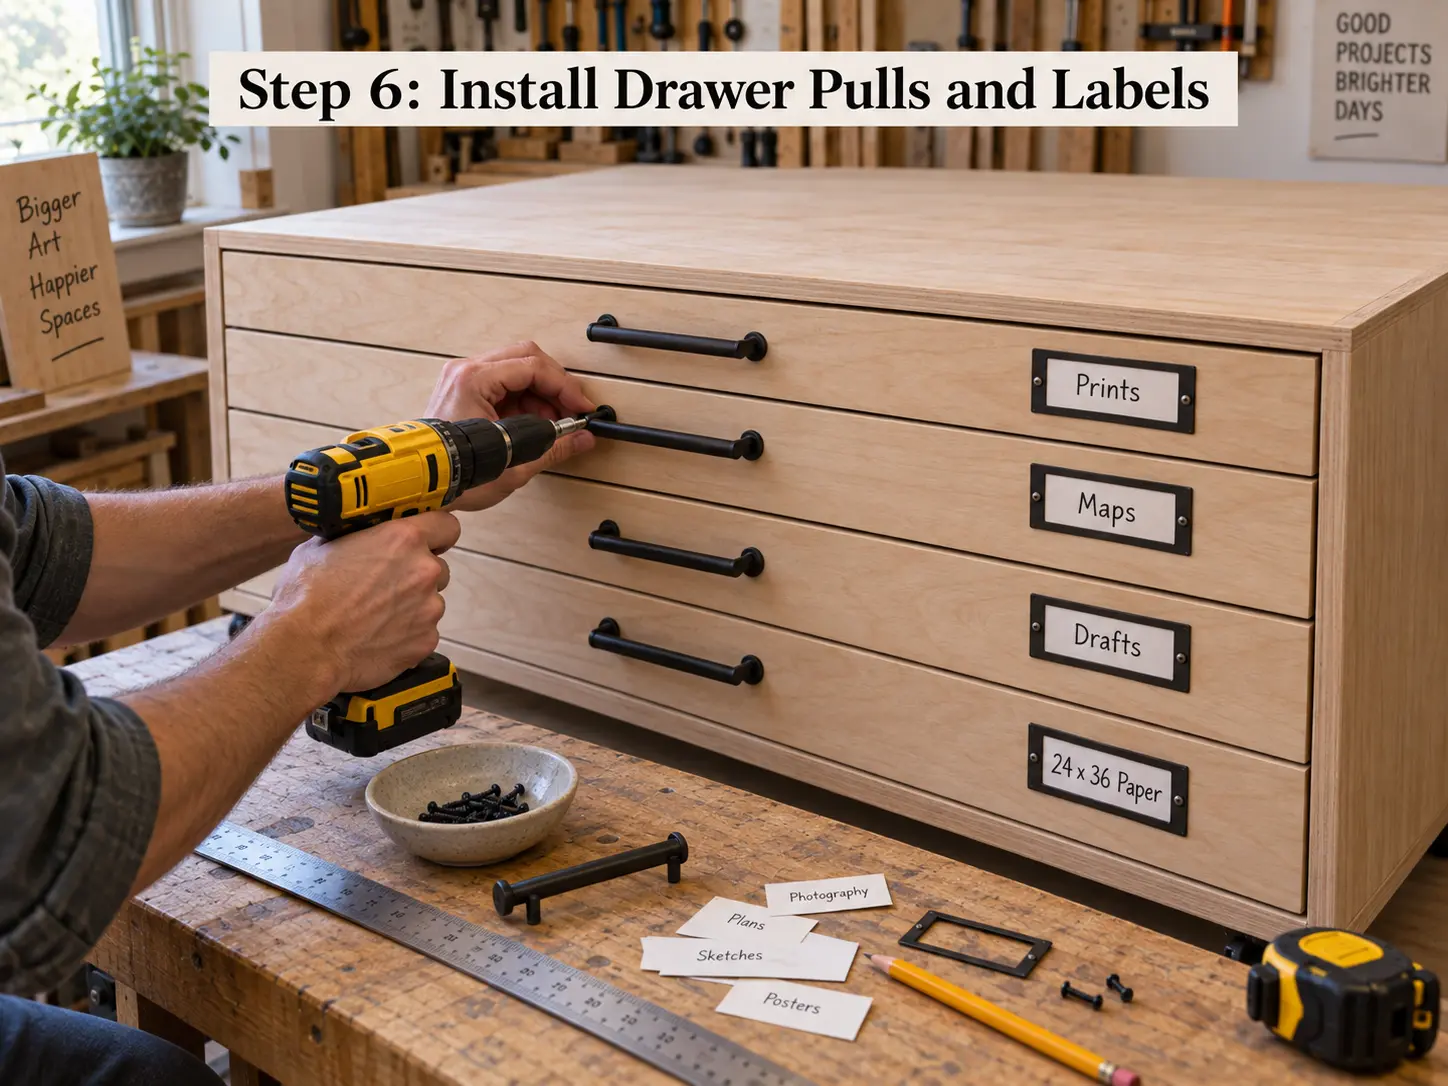
Step 6: Install Drawer Pulls and Labels
A centered pull works well on most shallow drawers. For especially wide drawers, two pulls can make opening smoother and reduce twisting. Labels are also worth adding from the start. Flat files fill up quickly, and every drawer can look identical once closed.
You can label them by size, project, or material:
- Finished prints
- 24 × 36 paper
- Maps
- Watercolors
- Drafts
- Tracing paper
- Vinyl
- Client work
Step 7: Sand and Finish the Cabinet
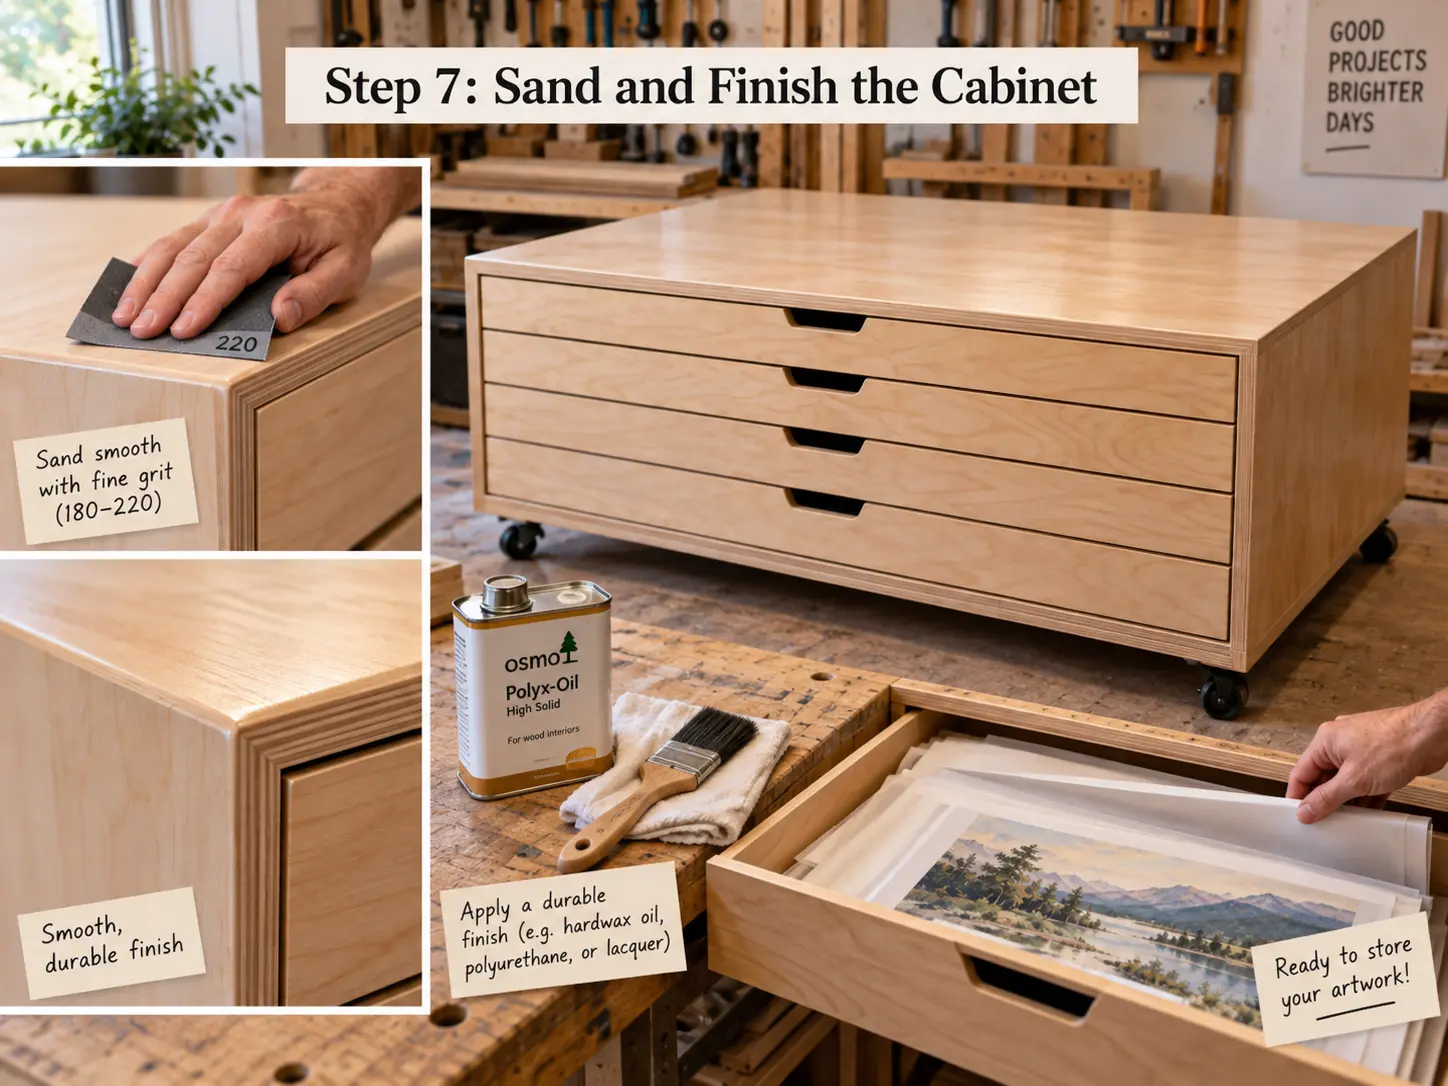
- Sand every exposed plywood edge before using the cabinet. 220-grit sandpaper works well for the final smoothing stage.
- Pay extra attention to the drawer openings and front edges. A small splinter can catch the corner of a print when you slide it inside.
- You can also apply edge banding to exposed plywood. This gives the cabinet a cleaner finish and removes rough laminated edges.
- For valuable artwork, avoid storing paper directly against bare wood. Wood, adhesives, and some finishes can release compounds that are not ideal for long-term paper storage.
- Use proper folders or liners between the artwork and cabinet surfaces. That gives you the convenience of a wooden cabinet without direct contact.
How to Make DIY Flat File Storage Safer for Artwork?
If you store valuable artwork, protect the paper itself as well as building a good cabinet. Proper enclosures, sensible stacking, and separation from bare wood can make a major difference.
Use Acid-Free Enclosures
The Library of Congress recommends acid- and lignin-free materials for storing paper. These include folders, mats, document boxes, and suitable polyester film sleeves. Do not rely only on the word “archival” on packaging. Look for clear information about the actual material and construction instead.
Keep Paper Away From Bare Wood
Avoid placing important prints or drawings directly on raw plywood. Wood and composite boards can release compounds that are not ideal for long-term paper storage. Protective folders create a barrier between the artwork and the cabinet. Separating paper from bare wood is a simple improvement if the artwork has real value.
Keep Drawers From Becoming Overloaded
It can be tempting to keep adding more sheets because the drawer still closes. That can quickly turn a shallow drawer into a heavy stack. Thicker stacks are harder to lift safely, and the sheets underneath become difficult to reach. For preservation storage, NPS guidance recommends keeping enclosed stacks around 1 inch or less.
Keep the Cabinet Off the Floor
Keeping a flat file directly on the floor can increase the risk from leaks and minor flooding. NPS museum guidance recommends raising flat files 6 inches above floor level. You do not have to follow that exact museum standard at home. The basic idea is simply to create some distance between valuable paper and the floor.
DIY Flat File Storage vs Buying a Cabinet
DIY makes sense when you already own tools and want a specific size. Buying can still be the better deal if you find a good cabinet on the used market.
Here is a realistic comparison:
That last option is worth checking before you start cutting plywood. Architecture firms, planning offices, universities, and print shops sometimes clear out large steel cabinets.
A used 10-drawer unit around $300 can be hard to beat. Once you price plywood, five pairs of slides, pulls, screws, glue, and finishing materials, DIY is not always the cheapest path.
Frequently Asked Questions
How Big Should a DIY Flat File Drawer Be?
Make the drawer larger than your biggest sheet. For 24 × 36-inch artwork, an internal drawer around 25 × 42 inches gives you useful handling space. The paper should slide in easily without sitting tightly against every edge. Leave enough space for protective folders if you plan to use them.
How Deep Should Flat File Drawers Be?
Around 2 inches of internal height is plenty for most flat-file drawers. You do not need deep storage because the materials are already thin. Keep individual paper stacks closer to 1 inch when possible. That makes them easier to lift, sort, and protect.
Can You Use Plywood for Flat File Storage?
Yes, plywood is one of the easiest materials for building a DIY flat file. It gives you a stable cabinet without making the structure unnecessarily complicated. For valuable artwork, keep the paper inside folders or on a suitable liner. Avoid leaving important prints directly against raw plywood for long periods.
How Much Does a Flat File Cabinet Cost?
A new five-drawer cabinet for 36 × 24-inch sheets sits around $685. Move up to 42 × 30 inches, and you are closer to $805. Large 48 × 36-inch cabinets can reach around $1,050. Used units are much less predictable, but good 10-drawer cabinets can sometimes appear around $300.
How Much Does It Cost to Build DIY Flat File Storage?
A basic open shelf setup has been built for around $138, although that figure comes from older material pricing. A proper drawer cabinet costs more because you need slides, drawer fronts, hardware, and considerably more plywood. If you already own the tools, the project becomes much more attractive.
How Long Does It Take to Build DIY Flat File Storage?
A simple open-shelf version can be completed much faster than a full drawer cabinet. Once you add five wide drawers, slides, sanding, and finishing, the job becomes a proper woodworking project.
If you are comfortable cutting plywood and installing slides, plan it as a weekend build rather than a one-hour project. Beginners should give themselves extra time for fitting and correcting drawer alignment.
Conclusion
DIY flat file storage becomes much easier once you stop thinking about the cabinet first. Start with your largest sheet, work out the drawer size, and then build everything around that measurement. For 24 × 36-inch material, you can use a 25 × 42-inch internal drawer area inside a 46¼ × 26¾-inch cabinet. Take extra care with drawer support, slide alignment, and squareness because wide drawers expose small mistakes quickly. If you store valuable artwork, also use proper enclosures and keep the paper away from bare wood.